SELAMAT DATANG DI SITUS SAYA BONARZI FRIADY SIHITE'. SEMOGA BERMAMFAAT


ILMU

Jumat, 25 Juli 2014

Mengembalikan Kapasitas SD Card Seperti Semula

Penting!!! Anda perlu melakukan Backup (copy) isi semua SD Card ke hardisk komputer. Karena semua data yang ada di dalamnya akah terhapus (format).

.

Berikut Step by step cara mengembalikan kapasitas / kondisi sdcard seperti semula:

1. Download MiniTool Partition Wizard – HOME yang Free di sini.
2. Install software tersebut (Jika sudah menginstall software ini, maka step 1 dan 2 ini lewati saja).
3. Cabut / lepaskan SD Card dari smartphone Galaxy Mini, lalu masukkan SD card ke Memory Card Reader, setelah itu tancapkan Memory Card Reader ke komputer.
4. Buka software MiniTool Partition Wizard Home Edition.
5. Cari nama SD Card Anda, biasanya di Disk 2. Karena ane punya 2 hardisk, maka di komputer ane kedetect sebagai Disk 3. Dan pastinya SD card kita akan ada 2 partisi (atau lebih, tergantung sebelumnya melakukan berapa banyak partisi).
6.  Kalo sudah ketemu, klik kanan partisi SD card yang pertama  lalu pilih menu >> Delete. Catatan: punya ane partisi ke 1: 6.95GB dan partisi ke 2: 525.56MB

7. Klik kanan lagi partisi SD card yang kedua lalu pilih menu >> Delete.

Kalo kita perhatikan partisi SD card yang pertama berubah status menjadi Unallocated space seperti tampak pada gambar di atas.
8. Jika Anda mempartisi SD card lebih dari 2 partisi, maka lakukan hal yang sama seperti pada step kesatu atau kedua (Klik kanan partisi X lalu pilih menu >> Delete). Nah, jika semua partisi sudah dihapus / di delete, maka akan tampak seperti pada gambar di bawah ini.

SD card sudah tampak menjadi 1 partisi dan ditandai dengan tanda asterix (bintang) serta kapasitasnya juga sudah seperti semula.
9. Sekarang tinggal Klik Kanan pada partisi tersebut lalu pilih menu >> Create

10. Atur / setting sesuai gambar berikut, lalu klik tombol OK.

Untuk nomor 3: silahkan beri nama sesuai keinginan Anda dan untuk nomor 4 pastikan Size And Location sesuai besaran kapasitas SD card Anda (punya ane 7.46GB), yang pasti untuk Unallocated Space Before dan After 0.00 MB seperti gambar diatas. Jangan seperti pada gambar di bawah ini,

Kalau seperti gambar di atas, nanti akan ada partisi yang ke-dua lagi..
11. Setelah klik tombol OK, maka akan tampak seperti pada gambar di bawah ini:

12. Klik tombol Apply.

Muncul gambar seperti ini,

Pilih Yes.
13. Tunggu prosesnya sampai selesai, seperti pada gambar di bawah ini.

Klik OK, dan SD card Anda sekarang sudah memiliki kembali seperti semula! Terakhir close program MiniTool Partition Wizard Home Edition lalu copy kembali semua isi SD card yang tadi telah di backup jika perlu. :D

Solusi Micro SD (MMC) Minta Format Terus

Tadi siang ada temen cewek yang minta tolong karena micro SD hape-nya tidak kedetek. Ketika dicolokkan ke laptop atau PC selalu minta format terus. Akhirnya saya utak atik dengan beberapa software format. Dan alhamdulillah akhirnya bisa digunakan kembali. Software yang saya gunakan adalah SD Formatter. Jika agan-agan menemui hal serupa mungkin bisa dicoba software satu ini.
Berikut langkah-langkahnya:
1. Colokkan micro SD, bisa menggunakan Card reader.
2. Buka aplikasi SD formatter. Tampilannya seperti gambar di bawah ini. Pastikan micro SD kita terbaca di aplikasi SD formatter. Kemudian klik FORMAT.
3. Akan muncul jendela seperti gambar di bawah. Klik OK.
4. Akan muncul jendela seperti gambar di bawah. Klik OK kembali.
5. Tunggu hingga proses format selesai. Akan muncul jendela pemberitahuan seperti di bawah ini. Klik OK.
6. Jika beruntung maka, micro SD bisa digunakan kembali.

MicroSD undetect, tidak bisa di format dengan SD adapter. Tapi normal bila di pasang sendiri

Mengunakan software untuk format SD card atau microSD memory

Untuk Format dengan PC melalui software

Software untuk format sudah tersedia dibawah ini

Bila tidak memiliki camera, bisa mengunakan software untuk format SD card baik microSD atau SDHC, SDXC.
Software bisa di download di SD Association dan software untuk format microSD atau SD card ini gratis, tidak perlu memilih ukuran dan software akan mengikuti standar format SD card yang sudah ada.
Format dahulu seperti halaman sebelumnya agar bisa dibaca oleh card reader. Baru di format dengan software SD Card Formatter

Download SD Card Formatter


Dengan software maka isi memory card akan sesuai dengan standar format yang ada. Sekaligus menghindari salah klik pada setting format di Windows.
Dibanding salah memilih ukuran Allocation Unit yang tidak dimengeri. Akhirnya lupa, selanjutnya memory akan terjadi error, malah file yang ada di dalamnya hilang.

Tip sederhana untuk memformat memory card jenis SD atau microSD. Gunakan software diatas, atau format langsung pada camera.

Mengatasi Pesan “in order to configure tcp/ip you must install and enable network adapter card” Saat Setting IP LAN


Mulai kemaren, komputer saya gak bisa setting IP Address pada sambungan LAN, katanya minta install driver lagi.
Kemudian saya saya cek di device manager, lalu saya uninstall network drivernya dan saya install lagi
Alhasil, sembuh penyakitnya :) )
Baiklah, saya share step by stepnya :) )
1. Buka “Device Manager”, caranya klik kanan My Computer – Device Manager


2. Uninstall Network Adapters, caranya klik kanan nama devicenya, trus pilih uninstall


3. Install Kembali Drivernya, caranya klik kanan pada nama user, trus klik “Scan for hardware changes”


4. Tunggu sampai installasi driver selesai, biasanya otomatis Windows Seven mengenali drivernya, kalau sudah selesai, coba buka settingan LAN, kalau berhasil akan bisa di buka settingan IP  Addressnya :)

#Selamat Mencoba :)

Pengertian Windows RTM, OEM, Dan Retail


Jika kita berbicara tentang Windows, mungkin yang ada dalam pikiran kita hanyalah nama-nama Windows yang sudah pernah ada seperti Windows XP, Vista, Windows 7 dan Windows 8. Tapi tahuka sobat, bahwa sebelum dan sesudah perilisan setiap OS Windows tersebut memiliki nama versi? Seperti misalnya Windows 8 RTM. Nah, kali ini kita akan mebahas beberapa nama versi tersebut.


Akhir-akhir ini semenjak kemunculan Windows 8 ke publik, banyak orang yang meperdebatkan nama versi OS Windows atau fase OS Windows tersebut, baik sebelum dan sesudah perilisan. Sebagai contoh, beberapa waktu lalu Softrickinfo sempat berkunjung ke salah satu situs yang membahas tentang Windows 8 Pro Retail dan menyatakan itu sebagai versi paling baru dan sangat berbeda dengan Windows 8 Pro RTM.

Softrickinfo akhirnya menanyakan hal tersebut ke sebuah forum diskusi tentang Windows yang kebetulan memiliki akses untuk berkomunikasi dengan pihak Microsoft. Dari diskusi yang Softrickinfo lakukan, Softrickinfo mendapatkan informasi tentang nama-nama versi (fase) Windows sebagai berikut.

  • Windows Release Preview

    Preview sama artinya dengan Beta. Jadi Windows Preview sama artinya dengan Windows versi Beta. Yaitu Windows yang masih dalam fase development dan sengaja dirilis agar publik bisa mencoba OS tersebut. Karena masih dalam fase development, Windows Preview atau Windows Release Preview biasanya masih memiliki banyak kekurangan. Seperti halnya Windows 8.1 Preview yang sampai saat ini masih terus diperbaiki.
  •  Windows RTM

    Windows RTM atau yang disebut juga sebagai "Release to Manufacturing" merupakan Windows yang sudah tidak lagi berada di fase development, tetapi belum dirilis untuk publik. Windows RTM diberikan Microsoft kepada partner mereka misalnya seperti Dell, Acer, Samsung, dsb beberapa bulan lebih awal. Sehingga mereka bisa melakukan pengetesan dan mempersiapkan PC mereka sebelum menjual PC tersebut ke publik.
  • Windows OEM

    Windows OEM atau yang disebut juga sebagai "Original Equipment Manufacturing", merupakan versi Windows yang sudah pre-installed (built-in) dengan komputer / laptop. Jadi jika sobat membeli PC yang sudah built-in Windows, maka Windows yang sobat miliki adalah Windows OEM.
  • Windows Retail

    Windows Retail merupakan versi final dari sebuah Windows yang sudah dirilis ke publik. Versi ini sama dengan OEM, hanya saja tidak dibundling dengan komputer / laptop melainkan dijual dalam box tersendiri. Windows Retail biasanya dijual dengan harga yang lebih mahal.

Nah, sudah tahu kan sekarang pengertian dan nama-nama versi Windows sebelum dan sesudah perilisan? Semoga artikel Softrickinfo ini bisa menjadi penambah wawasan pengetahuan sobat tentang Windows.

Membuat Rumus Rangking Di Ms. Excel

Membuat Rangking / Peringkat di Microsoft Excel Dengan Fungsi RANK

Musim Ujian telah selesai, berganti musim Terima Raport dan kemudian berlanjut menjadi Musim Liburan. Nah biasanya hal yang paling menyibukkan bagi anda yang berprofesi sebagai seorang guru dan wali kelas yaitu harus memberikan Nilai, kemudian menghitung rata-rata Nilai dan Selanjutnya menentukan Rangking / Peringkat Kelas. Dengan Microsoft Excel anda akan dibuat mudah dengan perhitungan cepat dengan Rumus yang memang menjadi salah satu keunggulan Microsoft Excel. Pada postingan ini saya akan memberikan tips bagaimana Menghitung Rata-rata danMenentukan Rangking atau Peringkat kepada anak didik anda. Langsung aja ikuti Tips berikut ini:

1. Bukalah Microsoft Excel anda, kemudian buatlah tabel dan isilah seperti pada gambar berikut:


2. Untuk mengisikan Rata - Rata gunakan Fungsi Average, bisa dituliskan seperti berikut:

=AVERAGE(C7:E7)

Average adalah fungsi yang digunakan untuk menghitung rata - rata, karena pada contoh kasus ini yang ingin diperoleh Nilai Rata-ratanya adalah Nilai MatematikaNilai Bahasa Inggris dan Nilai Bahasa Indonesia, maka di Dalam Kurung adalah (C7:E7) artinya menghitung rata-rata dari SEL C7 (Nilai Matematika) sampai dengan E7 (Nilai Bahasa Indonesia). Gunakan Copy rumus untuk mengisikan Sel dibawahnya. Jika Nilai dibelakang koma itu terlihat Lebih dari Dua, misalkan : 83,3333 Nah untuk membuat nilaidibelakang koma cuma 2 digit/karakter maka Block data yang akan edit, kemudian Klik Format - Cell - Number - Number, pada Decimal Placesmasukkan angka 2, kemudian klik OK. Seperti terlihat pada gambar dibawah:


Hasilnya bisa anda lihat pada gambar berikut:


3. Untuk mengetahui Siapa yang mempunyai Nilai tertinggi dan kemudian untuk menentukan Rangkingnya maka bisa menggunakan Fungsi Rank.Fungsi Rank digunakan untuk menentukan Rangking / Peringkat dalam suatu data tertentu. Misalkan pada data diatas untuk menentukan Rangking dengan melihat Rata-rata. Yang Nilai Rata-ratanya tertinggi maka dia akan mendapatkan Rangking Pertama. Ketik Rumus berikut pada Sel G7 :

=RANK(F7;$F$7:$F$16;0)

Deskripsi Rumus :
= Rumus Pasti diawali dengan tanda "Sama Dengan"
RANK adalah fungsi yang digunakan untuk menentukan rangking / peringkat
( dalam rumus setelah penggunaan fungsi pasti diikuti dengan tanda "Kurung Buka" kemudian di setelah selesai menuliskan rumus ditutup dengan Kurung Tutup atau )
F7 adalah Sel Kunci untuk menentukan rangking atau peringkat, pada contoh kasus ini adalah Sel pertama di Tabel Nilai Rata-rata
$F$7:$F$16 adalah data dari Nilai Rata-rata yang telah diabsolutkan (nilainya tetap), Untuk meng-absolutkan data, bisa dengan cara : Block data yang akan diabsolukan misalkan Block data pada Rata - Rata akan menjadi F7:F16 kemudian tekan F4 di keyboard supaya data tersebut menjadi $F$7:$F$16


Selamat Mencoba, semoga bermanfaat.....
Dan ada lagi yang seperti ini... hanya saja perbedanaanya pada rumus +COUNTIF

Cara Menentukan Peringkat /Ranking di Ms 

Excel

Rumus ms excel dalam menentukan rangking atau peringkat di microsoft excel biasa di lakukan untuk berbagai keperluan, misalnya dalam menentukan rangking siswa yang terdapat dalam suatu kelas, atau misal menentukan peringkat /ranking dari penerimaan calon pegawai baru berdasarkan kriteria-kriteria tertentu dalam suatu perusahaan/kantor, atau bisa saja ingin menentukan ranking pegawai, dan berbagai keperluan lainnya yang masih ada kaitannya dengan penilaian yang sifatnya ranking/berdasarkan kinerja terbaik hingga terendah.

Cara menentukan peringkat atau ranking di microsoft excel anda setidaknya perlu memahami beberapa hal dari sumber data yang ingin di jadikan patokan dalam penilaian peringkat/ranking yang ingin dilakukan. Apakah rangking/peringkat di ambil berdasarkan dari nilai rata-rata ataukah dari jumlah nilai yang diperoleh, semuanya harus anda tentukan terlebih dahulu yang bisa menggunakan rumus SUM, Average dan beberapa rumus dasar lainnya yang juga sudah pernah saya bahas disini.

Cara Menentukan Peringkat /Ranking di Ms Excel (2007/2010/2013)

  • Silahkan anda buat range data sesuai dengan keinginan di microsoft excel, misal dalam contoh kali ini penulis membuat contoh dalam menentukan ranking/peringkat kelas dari beberapa siswa yang saya ambil dari nilai rata-rata siswa, seperti ini
  • Karena dalam contoh kali ini cell/kolom peringkat berada pada Z9:Z43 sedangkan nilai rata-rata siswa terdapat pada cell Y9:Z9 (Cell Y9 sampai cell Z43) maka pada mulai pada cell Z9 (awal cell peringkat) saya ketikkan rumus "=RANK(Y9;$Y$9:$Y$43;0)+COUNTIF($Y$8:Y8;Y9)" tanpa tanda petik " " seperti ini
  • Kemudian untuk menggandakan rumus pada cell di bawah cell Z9, maka pada cell Z9 anda sorot pada bagian bawah kanan dan tunggu hingga muncul tanda plus (+) lalu tarik ke bawah (click and drag) misal dalam contoh kali ini hingga cell Z43.
Dari uraian diatas maka bisa anda terapkan sesuai dengan kondisi yang anda inginkan, perhatikan rumus yang penulis beri warna biru, yang merupakan sumber penilaian yang dijadikan acuan dalam menentukan ranking/peringkat yang dalam contoh ini diambil dari nilai rata-rata siswa yang berada pada cell Y9 sampai Y43, dan yang paling penting anda memahami alurnya untuk menentukan rangking/peringkat di microsoft excel

Managing Remote Print Servers

In the previous chapter it was stated that the Print Management tool provides a central location from which the print services for an entire network may be managed. So far we have only looked and managing the print server running on the local computer. In this section we will look at adding remote servers to the local Print Management configuration. For the purposes of this example a theoretical configuration consisting of two Windows Server 2008 systems named winserver-1 and winserver-2 is assumed. Both systems have the print services role installed and Print Management on winserver-1 will be configured to also manage print services on winserver-2. This is achieved by first launching Print Management on the local winserver-1 system (Start -> Administration Tools -> Print Management), right clicking on the Print Servers node of the tree hierarchy in the left hand pane and selecting the Add/Remove Servers option.
From the resulting menu, select the Add/Remove Servers option. The resulting dialog box displays the currently configured print servers under the management of local Print Management. If no remote print servers have been added previously the only server listed will be the local system. To add additional print servers either enter a comma separated list of server names, or use the Browsebutton to locate servers on the network. When one or more servers have been selected, click on the Add to list button to add the servers to the list. The following figure illustrates the Add/Remove Servers dialog box configured with both the local and remote servers:
Adding remote print servers to Print Management Console

Once all the required remote print servers have been added to the list, click on Apply then close the dialog to return to the main Print Management window. The new print servers will now appear alongside the local server under Print Servers in the left hand pane of the Print Management screen as illustrated below:


Managing multiple print servers on Windows Server 2008

Migrating Printers and Queues Between Servers

Windows Server 2008 also provides the ability to migrate both printers and print queues from one print server to another. This makes it easy, for example, to take a print server off-line for maintenance or to permanently re-assign a printer from one print server to another. The steps outlined below assume that print Management has been configured to manage both the source and target print servers as outlined in the preceding section of this chapter. If this is not the case, the printer export file will need to be copied onto the destination server or made available via file sharing and imported using Print Management on that server.
This form of migration is performed using the Printer Migration Wizard which, along with most other tasks, is accessed from the Print Management interface. Once Print Management is up and running, right click on the server in the left pane from which the printer is to be migrated (the source server) and select Export Printers To a File from the menu. Print Management will subsequently display a dialog listing the printer drivers, port and queues currently configured on the selected print server as illustrated below:

List of printers to be exported prior to migration


After reviewing the listed information click Next and select a suitable location to save the printer export file and click Next once again to perform the export process. Depending on the number of printers being exported and the size of the drivers the export process may take a few minutes to complete. If the export was successful a message will appear beneath the progress bar stating this fact. If the export was unsuccessful, click on the Open Event Viewer button provided to learn more about the cause of the problem so that remedial action may be taken. Assuming a successful export click Finish to dismiss the Printer Migration dialog.

The next step is to import the printers into the target server. Begin by right clicking on the destination server in the Print Management window and selecting Import printers from a file.... In the resulting dialog, use the browse button to navigate to the export file, select it and click on Next to proceed. Once the file has been read a screen will appear identical to the one displayed prior to exporting the printer objects in the preceding step. Review this information and click Next to display the Select import options screen as illustrated in the following figure:

Selecting the printer import options


These options require a little explanation:

  • Keep existing printers; import copies - It is possible that a printer being imported is already also installed on the destination server. With this option selected, the original printer on the destination server will be left unchanged and the new printer imported as a copy.
  • Overwrite existing printers - If the printer being imported is already installed on the target server it is overwritten by the imported copy when this option is selected.
  • List printers that were previously listed - When selected, only printers that were already listed in Active Directory will still be listed after the import process is completed.
  • List all printers - All printers are listed in Active Directory
  • Don't list any printers - No printers are listed in Active Directory
Once the required settings are configured, click Next to initiate the printer import process. The printer configurations, drivers and queues will be subsequently be imported onto the target print server. If errors are reported click on the Open Event Viewer button to obtain additional information. In particular, be mindful of printers that were physically connected to the source print server. Since they are not physically connected to the target server an error will likely occur during the migration. Even if the printer was physically moved to the target system prior to migration it is also possible that it is connected to a different physical port to that used on the source server. Such problems can be resolved by right clicking on the imported printer in Print Management, selecting Properties and making the necessary configuration changes.

Configuring Printer Permissions

Access to printers is controlled through the configuration of printer permissions. By default, a printer is accessible to all users on the local system, and if shared, all users elsewhere on the network. Printer permissions are divided into two categories, special permissions and standard permissions. Before describing how to change the permissions on a printer it is first important to understand the meaning of each permission option.
The standard printer permissions are outlined in the following table:
PermissionDescription
PrintAllows users and groups to send documents to the printer and to manage their own print jobs. Also includes the Read special permission allowing viewing, but not alteration, of printer permissions
Manage PrintersAllows full management of the printer, including changing shared status, changing of permissions and properties, taking ownership of printers and print jobs and starting and stopping print jobs. Includes the ReadChange and Take Ownership special permissions.
Manage DocumentsAllows user and groups to manage print jobs but does not provide the ability to print. Permissions consist of pausing, restarting, resuming and reordering and canceling print jobs. Includes the ReadChange and Take Ownership special permissions
The special permissions are as follows:
PermissionDescription
Read PermissionsUser or Group may view the permissions on the printer.
Change PermissionsUser or Group may change the permissions of a printer.
Take OwnershipUser or Group may take ownership of printer and/or print jobs.
The current permissions for a printer may be viewed and changed by right clicking on that printer in the Print Management tool (Start -> Administrative Tools -> Print Management), selectingProperties and clicking on the Security tab:

Windows Server Printer permissions


To change the permissions for a currently listed user or group, select the user or group and change the Allow and Deny permissions to the required settings. When the settings are configured, click on apply to commit the changes. If the user or group is not currently listed in the properties dialog, click on the Add... button to invoke the Select Users or Groups dialog. Change the Location setting if necessary and then enter the names of the users or groups, separated by semi-colons into the bottom text box. Click the Check Names button to verify the selected users or groups exist within the current location scope:


Selecting users and groups


Assuming the names are correct click on OK to return to the properties dialog where the selected users and/or groups will now be included in the Group or user names list. To configure permissions, select a user or group and set the permissions in the Permissions for section of the dialog. Click Apply to commit the changes and repeat the task for any other users or groups added to the list.

To configure the special permissions click on the Advanced button in the Security page of the properties panel to display the Advanced Security Settings dialog as illustrated below:

Advanced Printer Security Settings


To modify the permissions for a user or group select that object from the list and click Edit... to display the Permission Entry for dialog. In this dialog both the standard and special permissions for the selected user or group are displayed and may be changed as required. As noted previously, certain special permissions are implicit in standard permission settings. For example, setting theManage Printers standard permission also enables the ReadChange and Take Ownership special permissions. Once the desired permission changes have been made click on OK to dismiss thePermission Entry for dialog, followed by Apply, then OK in the Advanced Security Settings dialog. Finally, click on OK to dismiss the properties dialog and return to Print Management.

Changing Printer Ownership

After a printer has been installed the owner, by default, is SYSTEM. Ownership may be taken either by an administrator or by a user or group which has been assigned Take ownership permission for the printer.
To assign ownership to another user or group, open the properties dialog for the printer, select the Security tab and then click on Advanced. In the advanced settings screen, select the Owner tab. This screen will list the current owner, together with a list of users and group to which ownership may be changed. If the intended new owner is not listed in the Change owner to: list, click on theOther users or groups... button to access the Select User or Group dialog box. Enter the name of a user or group and click on the Check Names button. With the correct name selected, click on OKto return to the list of owners. Select the desired owner from the list and click on Apply to commit the change of ownership.

Printer Pooling Configuration

Printer Pooling refers to the process of allocating multiple physical print devices to a single logical printer. In such a configuration print jobs to the logical printer are assigned by the print server to the first available physical printer in the pool. A key requirement is that the physical printers that make up a pool must all use the same print driver and have the same amount of memory.
To configure printer pooling, install a printer such that it uses a particular port (such as a local port or IP address). Attach the other printers that are to make up the pool, but do not install them via Print Management. Once the first printer is installed, open the properties dialog for that printer by right clicking on it in Print Management and select the Ports tab. In the Ports page select theEnable printer pooling option. If the ports to which the additional printers are connected are listed make sure they are all selected. Note that a pool can be made up of printers connected in any combination of ways (network, serial, parallel, USB etc). In the case of network printers, click on Add Port... and enter the IP address of the additional printer, click New Port... and allow the wizard to create the new port. Once all the new ports are added and selected, click Apply to create the printer pool. The following figure illustrates a printer pool comprising three HP Deskjet network printers:

Configuring a Windows Printer Pool

Configuring Printer Availability and Priority

Rather than working with the actual physical printers, users are in fact working with logical printers which map onto a physical print device. Windows allows a single physical print device to be assigned to multiple logical printers. This approach brings considerable flexibility in terms of controlling the availability of a printer to different groups of users and the priority of their print jobs.
This concept is best described by example. Suppose that a printer is to be made available to members of an engineering group only during the office hours. That same printer, however, is to always be available to the management group. Similarly, any print jobs belonging to the management group must be given a higher priority than those of the engineering group. To achieve this objective, two logical printers assigned to the same physical print device will be created, one for engineering and one for management. The availability of the engineering logical printer will be restricted to office hours and given a low priority. The management logical printer will always be available and will be given a high priority. Permissions on the logical printers will then be configured such that the engineering team is denied access to the management printer.
Availability and priority is configured from the printer property panel. To access these settings, launch Print Management and navigate to the required printer in the left pane. Right click on the printer, select Properties and then choose the Advanced tab. Once selected, the property panel will appear as follows:

Configuring printer priority and availability


For the management logical printer the Always available option will be selected and a high priority assigned (for example 95). Once these values are set, click on the Security tab of the properties dialog and deny access to the printer for the engineering group. Repeat these steps for the engineering logical printer, this time selecting the Available from option and specifying the hours that the printer is available.

Instalasi Print Server Windows Server 2008 R2 (Versi Bahasa Indonesia)

Langkah pertama dalam menyiapkan server cetak Windows Server 2008 adalah menginstal peran Print Server. Hal ini dicapai dengan meluncurkan Server Manager, memilih Peran item dari pohon di sebelah kiri dan mengklik Tambahkan Peran. Dalam Menambahkan Peran Wisaya klik next pada layar Selamat Datang jika muncul dan kemudian pilih Print Services pilihan. Klik Next dan membaca informasi yang ditampilkan sebelum mengklik Next sekali lagi untuk melanjutkan ke Pilih Layanan Peran layar. Pada layar ini sejumlah pilihan layanan yang berbeda yang tersedia untuk seleksi dan instalasi seperti yang dijelaskan dalam tabel berikut:
pilihan 
deskripsi 
Print Server Menginstall server cetak dan konsol Cetak Manajemen. Ini merupakan prasyarat untuk mengkonfigurasi layanan cetak pada Windows Server 2008. 
LDP Layanan Menginstal TCP / IP Line Printer Daemon Service (LPDSV) memungkinkan UNIX, Linux dan Printer Jalur lainnya remote (LPR0) komputer berbasis untuk mencetak melalui server cetak. Pengaturan ini juga membuka pelabuhan di Windows Firewall. 
Internet Printing Menciptakan Internet Information Service (IIS) host situs web di mana pengguna dapat mengatur printer dan terhubung dan mencetak ke printer yang dibagi host di server menggunakan Internet Printing Protocol (IPP). URL default untuk situs web adalah http://servername/Printers, di mana ServerName adalah nama server yang menjalankan layanan cetak.
Dengan pilihan yang diperlukan dipilih, klik Next. Perhatikan bahwa jika Internet Printing terpilih dan peran IIS saat ini tidak dipasang di server, wizard akan meminta untuk menambahkan peran tambahan. Jika diminta, klik pada Add Diperlukan Peran Jasa tombol untuk melanjutkan. Klik Next pada setiap halaman informasi yang dapat ditampilkan sampai layar konfirmasi muncul. Setelah meninjau informasi ringkasan yang disediakan, klik Install untuk memulai proses instalasi.
Print Services Management Tools
Setelah layanan cetak terpasang sejumlah alat manajemen cetak sekarang tersedia pada sistem. Pertama dan terpenting adalah Manajemen Cetak snap-in yang dapat diakses melalui Start - > All Programs - > Administrative Tools - > Cetak Manajemen . Sebuah alat baris perintah yang berguna juga tersedia dalam bentuk cetak Backup Migrasi alat Recovery. Executable ini dinamai Printbrm.exe dan terletak di % SystemRoot % \ System32 \ Spool \ Tools.
Sejumlah alat VBScript berguna juga tersedia dalam % SystemRoot % \ System32 \ Printing_Admin_Scripts \ en -US (perhatikan bahwa jika Anda menggunakan bahasa selain en -US jalan perlu berubah sesuai ) . Script yang tersedia untuk mengkonfigurasi pengaturan printer ( prncfg.vbs ) , daftar dan mengelola driver printer ( prndrvr.vbs ) , mengelola pekerjaan cetak ( prnjobs.vbs ) , mengelola antrian cetak ( prnQctl.vbs ) , printer penerbitan untuk direktori aktif ( pubprn. vbs ) , menginstal dan mengelola printer ( prnmngr.vbs ) dan untuk mengelola TCP / IP port printer ( prnport.vbs ) .
The skrip dieksekusi menggunakan perintah cscript.exe dan ketika dijalankan tanpa opsi baris perintah akan menampilkan daftar pilihan yang didukung . Sebagai contoh:
cscript prnjobs.vbs

Microsoft (R) Windows Script Host Version 5.7
Copyright (C) Microsoft Corporation. All rights reserved.

Usage: prnjobs [-zmxl?] [-s server][-p printer][-j jobid][-u user name][-w password]

Arguments:
-j     - job id
-l     - list all jobs
-m     - resume the job
-p     - printer name
-s     - server name
-u     - user name
-w     - password
-x     - cancel the job
-z     - pause the job
-?     - display command usage

Examples:
prnjobs -z -p printer -j jobid
prnjobs -l -p printer
prnjobs -l
Menambahkan Printer Jaringan ke Print Server menggunakan Auto-mendeteksi
Jelas, server cetak tanpa printer tidak akan banyak berguna . Tidak mengherankan , oleh karena itu, langkah selanjutnya setelah menginstal Print Services adalah untuk menambahkan printer . Printer baik dapat jaringan berbasis , atau secara lokal terhubung ke server . Dalam kasus printer jaringan , ini dapat ditambahkan secara manual atau menggunakan auto - detection . Di bawah auto - detection , Manajemen Cetak scan subnet yang server berada dan mencari semua perangkat yang dapat mengidentifikasi sebagai printer . Sebagai printer yang terdeteksi pada jaringan mereka ditampilkan dalam daftar di mana mereka dapat dipilih dan ditambahkan ke server cetak .
Untuk menambahkan printer jaringan menggunakan auto - deteksi , membuka alat Manajemen Print via Start - > All Programs - > Administrative Tools - > Print Manajemen , terungkap Server Print dari daftar di sebelah kiri , klik kanan print server lokal atau remote untuk yang printer baru yang akan ditambahkan dan pilih Add printer .... ini akan menampilkan Jaringan Instalasi printer Wizard seperti yang digambarkan di bawah ini :
The Windows Server 2008 Network Printer Wizard
Dalam rangka untuk memiliki pencarian wizard untuk printer pada jaringan, pastikan bahwa Search for printer jaringan dipilih dan klik Next. Pada titik ini wizard akan memulai proses pemindaian jaringan untuk printer. Karena setiap printer terdeteksi itu akan tercantum. Pada contoh berikut, wizard telah mendeteksi HP Deskjet 5800 printer di jaringan dengan alamat IP dari 192.168.2.10:
Scanning for Network Printers
Jika tidak ada printer yang terdeteksi, pastikan bahwa printer terhubung ke jaringan dan dihidupkan dan berada di subnet yang sama dengan print server. Setelah pemindaian selesai, pilih printer yang diperlukan dari daftar dan klik Next untuk melanjutkan ke layar Printer Driver. Jika driver untuk printer tersebut telah terinstal, pilih dari daftar drop-down. Atau pilih opsi Install driver baru dan klik Next untuk melanjutkan ke layar Instalasi Printer di mana daftar produsen printer dan model disajikan. Pilih membuat dan model printer dari daftar:
Selecting the manufacturer and model of a Network Printer
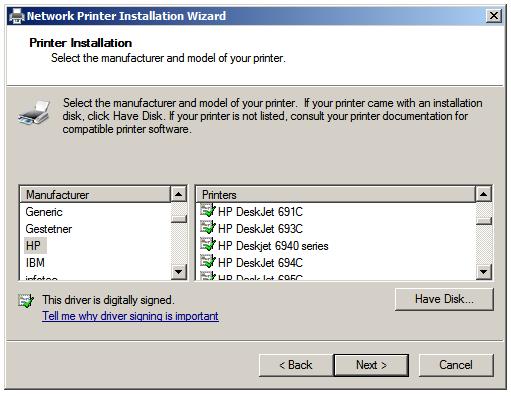
Jika membuat dan model printer tidak terdaftar, memeriksa untuk melihat apakah printer disertakan dengan disk driver, atau apakah sopir dapat diperoleh dari situs web produsen. Dengan asumsi ini menjadi kasus, gunakan tombol Have Disk untuk mencari dan memilih driver produsen yang sesuai. Dengan baik printer yang dipilih dari daftar, atau driver yang cocok ditentukan, klik Next untuk mengkonfigurasi Nama Printer and Share Settings. Pada layar ini, masukkan nama yang printer baru akan dibagikan kepada klien melalui jaringan. Jika printer tidak untuk dibagikan, pastikan Share printer ini tidak dipilih. Juga, masukkan deskripsi lokasi (misalnya, "Printer di Accounts") dan komentar jika diinginkan. Klik Next untuk menampilkan layar summary printer seperti yang digambarkan di bawah ini di mana pengaturan yang dipilih disajikan untuk ditinjau:...
New network printer settings summary screen
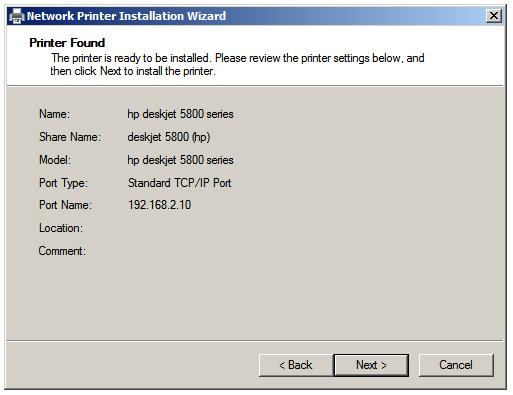
Dengan asumsi ringkasan konfigurasi sudah benar, klik Next untuk menginstal printer baru. Pada titik ini wizard akan melaporkan bahwa pengemudi telah berhasil diinstal dan halaman percobaan siap untuk dicetak. Jika printer lain akan ditambahkan ke server print, pilih Add Printer Pilihan lain untuk menginstruksikan wizard untuk loop kembali ke awal proses instalasi.
Manual Menambahkan Printer Jaringan ke Print Server
Bagian sebelumnya membahas penggunaan auto - detection untuk mencari dan menginstal dan jaringan printer yang terpasang . Bagian ini akan mencakup instalasi manual dari printer jaringan . Seperti dengan auto - detection , mulai dengan menerapkan alat manajemen Print ( Start - > All Programs - > Administrative Tools - > Print Management) , terungkap kategori Print Server dari daftar di sebelah kiri , klik kanan print server lokal atau remote yang printer baru yang akan ditambahkan dan pilih Add printer .... ini akan meluncurkan Jaringan Instalasi 
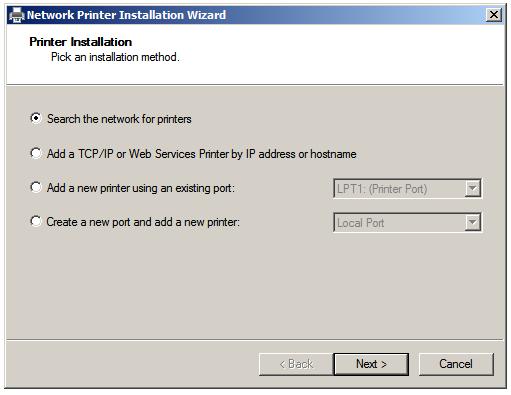
printer Wizard . Pada halaman awal wizard pilih opsi berlabel Menambahkan TCP / IP atau Web Services Printer berdasarkan alamat IP 
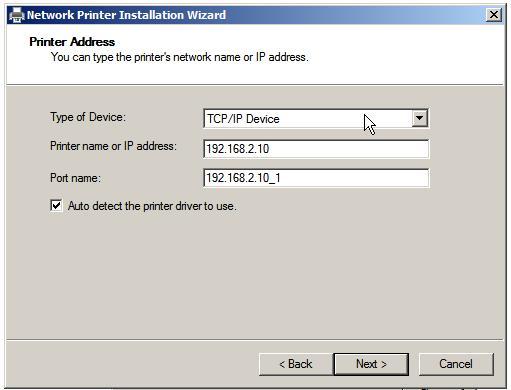
atau nama host dan klik Next untuk melanjutkan ke layar Printer Alamat . Jika jenis printer yang diketahui ( TCP / IP perangkat atau Web Services Printer ) membuat pilihan yang tepat . Atau , biarkan pengaturan sebagai Auto Detect untuk memiliki wizard mengidentifikasi jenis printer . Masukkan alamat IP atau nama host printer yang akan ditambahkan ke server cetak . Wizard akan secara otomatis menghasilkan nama port yang unik untuk menemani alamat IP atau hostname . Pilihan ini juga disediakan untuk memiliki usaha wizard untuk mengidentifikasi driver yang sesuai untuk printer baru . Gambar berikut mengilustrasikan layar seperti yang dijelaskan :...
Configuring the IP address and port for a new network printer
Klik Next untuk menginstal driver printer. Jika driver untuk printer sudah diinstal pada server cetak, pilih dari daftar drop-down. Atau pilih opsi Install driver baru dan klik Next untuk melanjutkan ke layar Instalasi Printer di mana daftar produsen printer dan model disajikan. Pilih membuat dan model printer dari daftar, atau gunakan Have Disk untuk menginstal produsen disediakan sopir. 
Dengan salah satu printer yang dipilih, klik Next untuk mengkonfigurasi Nama Printer and Share Settings. Pada layar ini, masukkan nama yang printer baru akan dibagikan kepada klien melalui jaringan. Jika printer tidak untuk dibagikan, pastikan Share printer ini tidak dipilih. Juga, masukkan deskripsi lokasi (misalnya, "Color Printer Penjualan") dan komentar jika diinginkan. Klik Next untuk melakukan instalasi dan mencetak halaman uji opsional.
Menambahkan Printer Lokal Terhubung
Karena server umumnya diasingkan di iklim ruang server dikendalikan dan printer yang terletak di dekat dengan pengguna selalu tampaknya sedikit aneh untuk berbicara tentang menginstal printer dengan secara lokal terhubung ke server. Yang mengatakan, itu adalah topik yang perlu dibahas, dan menutupinya kita akan. 
Printer lokal akan terhubung ke server menggunakan serial (COM) pelabuhan, port paralel (LPT) atau Bus Serial (USB) Universal. 
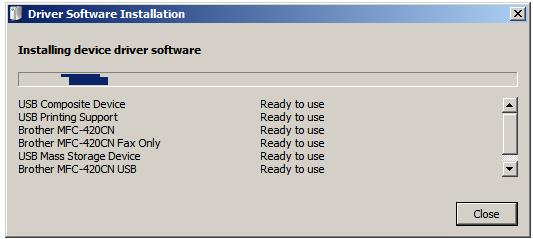
Seringkali, Windows secara otomatis akan mendeteksi printer baru segera setelah tersambung dan menyala. Dalam situasi ini sebuah ikon akan muncul di task bar yang menunjukkan bahwa perangkat baru telah terdeteksi. Mengklik ikon ini menyajikan pilihan untuk melihat rincian tentang proses instalasi, sehingga penampilan dialog mirip dengan yang digambarkan di bawah ini, di mana printer Brother MFC-420CN telah terdeteksi dan sedang diinstal:
Windows Server 2008 Auto detecting and installing a USB printer
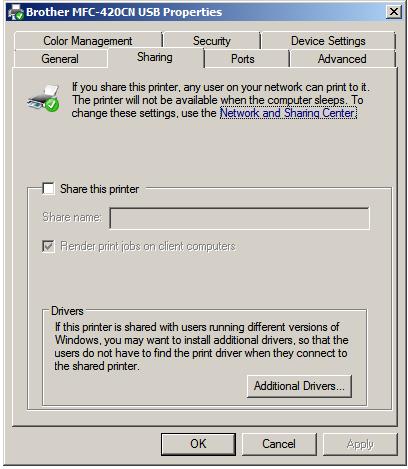
Setelah printer telah terinstal, kemungkinan akan perlu dikonfigurasi untuk berbagi jaringan. Untuk mencapai hal ini, meluncurkan alat Manajemen Print, pilih server cetak ke printer yang terhubung secara fisik dan klik Printers. Pusat panel alat akan menampilkan daftar printer yang diinstal pada server cetak saat ini. Identifikasi printer yang diperlukan dalam daftar, klik dua kali di atasnya untuk menampilkan dialog properti dan pilih tab Sharing:
Printer Share properties
If the printer is to be shared with network client, set the Share this printer check box and enter a suitable share name for the printer. This page also allows Client-side Rendering(CSR) to be configured. When selected, all rendering of print jobs is performed on the client and just the RAW print data sent to the server for printing. This offloads the rendering overhead to the client computers, thereby reducing the load, and increasing the scalability of the print server.
If Windows fails to auto-detect the printer it may be added manually from Print Management by right clicking on the print server to which the device is attached and selecting Add Printer.... On the initial screen select the Add new printer using an existing port and choose the port to which the printer is connected from the drop down list. Once selected, click Next to install a printer driver. If one is already installed, select it from the drop down next to the use an existing printer driver on the computer. Alternatively, select Install a new printer driver and either select the printer make and model from the list, or use the Have Disk to install the manufacturer supplied driver. Click Next to proceed to the Printer Name and Sharing screen. Choose whether the printer is to be shared and, if so, by what name. Proceed to the summary screen, review the information and complete the installation.
With a printer server configured and printers added the next step is to cover the management of printer servers on Windows Server 2008.

Installing the Print Server

The first step in setting up a Windows Server 2008 print server is to install the Print Server role. This is achieved by launching the Server Manager, selecting Roles item from the tree in the left pane and clicking on Add Roles. In the Add Roles Wizard click next on the Welcome screen if one appears and then select the Print Services option. Click Next and read the information displayed before clicking Next once again to proceed to the Select Role Services screen. On this screen a number of different service options are available for selection and installation as outlined in the following table:
Option
Description
Print ServerInstalls the print server and Print Management console. This is a prerequisite for configuring print services on Windows Server 2008.
LDP ServiceInstalls the TCP/IP Line Printer Daemon Service (LPDSV) allowing UNIX, Linux and other Line Printer Remote (LPR0) based computers to print via the print server. This setting also opens port in the Windows Firewall.
Internet PrintingCreates an Internet Information Service (IIS) hosted web site where users can manage printers and connect and print to shared printers hosted in the server using the Internet Printing Protocol (IPP). The default URL for the web site is http://servername/Printers, where servername is the name of the server running the print services.
With the required options selected, click Next. Note that if Internet Printing was selected and the IIS role is not currently installed in the server, the wizard will prompt to add additional roles. If prompted, click on the Add Required Role Services button to proceed. Click Next on any information pages that may be displayed until the Confirmation screen appears. After reviewing the summary information provided, click Install to initiate the installation process.

Print Services Management Tools

Once print services are installed a number of print management tools are now available on the system. First and foremost is the Print Management snap-in which may be accessed via Start -> All Programs -> Administrative Tools -> Print Management. A useful command-line tool is also available in the form of the Print Backup Recovery Migration tool. The executable is named Printbrm.exeand is located in %SystemRoot%\System32\Spool\Tools.
A number of useful VBscript tools are also available in %SystemRoot%\System32\Printing_Admin_Scripts\en-US (note that if you use a language other than en-US the path will need to be change accordingly). Scripts are available for configuring printer settings (prncfg.vbs), listing and managing printer drivers (prndrvr.vbs), managing print jobs (prnjobs.vbs), managing print queues (prnQctl.vbs), publishing printers to active directory (pubprn.vbs), installing and managing printers (prnmngr.vbs) and for managing TCP/IP printer ports (prnport.vbs).
The scripts are executed using the cscript.exe command and when run without any command-line options will display a list of supported options. For example:
cscript prnjobs.vbs

Microsoft (R) Windows Script Host Version 5.7
Copyright (C) Microsoft Corporation. All rights reserved.

Usage: prnjobs [-zmxl?] [-s server][-p printer][-j jobid][-u user name][-w password]

Arguments:
-j     - job id
-l     - list all jobs
-m     - resume the job
-p     - printer name
-s     - server name
-u     - user name
-w     - password
-x     - cancel the job
-z     - pause the job
-?     - display command usage

Examples:
prnjobs -z -p printer -j jobid
prnjobs -l -p printer
prnjobs -l

Adding Network Printers to the Print Server using Auto-detect

Obviously, a print server without any printers isn't going to be of much use. Not surprisingly, therefore, the next step after installing Print Services is to add printers. Printers may either be network based, or locally connected to the server. In the case of network printers, these may be added either manually or using auto-detection. Under auto-detection, Print Management scans the subnet on which the server resides and searches for any devices it can identify as being printers. As printers are detected on the network they are displayed in a list where they may be selected and added to the print server.
To add network printers using auto-detection, open the Print Management tool via Start -> All Programs -> Administrative Tools -> Print Management, unfold the Print Servers from the list in the left pane, right click the local or remote print server to which the new printer is to be added and select Add Printer.... This will display the Network Printer Installation Wizard as illustrated below:
The Windows Server 2008 Network Printer Wizard

In order to have the wizard search for printers on the network, ensure that the Search for network printers is selected and click on Next. At this point the wizard will begin the process of scanning the network for printers. As each printer is detected it will be listed. In the following example, the wizard has detected an HP Deskjet 5800 printer on the network with an IP address of 192.168.2.10:
Scanning for Network Printers

If no printers are detected, ensure that the printers are connected to the network and powered on and are on the same subnet as the print server. Once the scan is complete, select the required printer from the list and click Next to proceed to the Printer Driver screen. If a driver for the printer is already installed, select it from the drop down list. Alternatively select the Install a new driveroption and click Next to proceed to the Printer Installation screen where a list of printer manufacturers and models is presented. Select the make and model of the printer from the list:

Selecting the manufacturer and model of a Network Printer

If the make and model of printer are not listed, check to see if the printer was supplied with a driver disk, or whether a driver can be obtained from the manufacturer's web site. Assuming this to be the case, use the Have Disk button to browse for and select the appropriate manufacturer driver. With either a printer selected from the list, or a suitable driver specified, click on Next to configure thePrinter Name and Share Settings. On this screen, enter the name by which the new printer will be shared to clients over the network. If the printer is not to be shared, ensure that the Share this printer is not selected. Also, enter a location description (for example, "Printer in Accounts") and comment if desired. Click Next to display the printer summary screen as illustrated below where the selected settings are presented for review:

New network printer settings summary screen

Assuming the configuration summary is correct, click Next to install the new printer. At this point the wizard will report that the driver has been successfully installed and that a test page is ready to be printed. If another printer is to be added to the print server, select the Add Another Printer option to instruct the wizard to loop back to the start of the installation process.

Manually Adding Network Printers to a Print Server

The preceding section discussed the use of auto-detection to locate and install and network attached printer. This section will cover the manual installation of a network printer. As with auto-detection, begin by invoking the Print Management tool (Start -> All Programs -> Administrative Tools -> Print Management), unfold the Print Servers category from the list in the left pane, right click the local or remote print server to which the new printer is to be added and select Add Printer.... This will launch the Network Printer Installation Wizard. On the initial page of the wizard select the option labeled Add a TCP/IP or Web Services Printer by IP address or hostname and click Next to proceed to the Printer Address screen. If the type of printer is known (TCP/IP device or Web Services Printer) make the appropriate selection. Alternatively, leave the setting as Auto Detect to have the wizard identify the printer type. Enter the IP address or hostname of the printer to be added to the print server. The wizard will automatically generate a unique port name to accompany the IP address or hostname. The option is also provided to have the wizard attempt to identify the appropriate driver for the new printer. The following figure illustrates the screen as described:

Configuring the IP address and port for a new network printer

Click Next to install a printer driver. If a driver for the printer is already installed on the print server, select it from the drop down list. Alternatively select the Install a new driver option and click Next to proceed to the Printer Installation screen where a list of printer manufacturers and models is presented. Select the make and model of the printer from the list, or use the Have Disk to install the manufacturer supplied driver.
With either a printer selected, click on Next to configure the Printer Name and Share Settings. On this screen, enter the name by which the new printer will be shared to clients over the network. If the printer is not to be shared, ensure that the Share this printer is not selected. Also, enter a location description (for example, "Color Printer in Sales") and comment if desired. Click Next to perform the installation and print an optional test page.

Adding a Locally Connected Printer

Since servers are generally sequestered in climate controlled server room and printers are located in proximity to the users it always seems a little odd to talk about installing printers with are locally connected to servers. That said, it is a topic which needs to covered, and cover it we will.
Local printers will be connected to the server using a serial (COM) port, a parallel (LPT) port or a Universal Serial Bus (USB) port. Often, Windows will automatically detect a new printer as soon as it is connected and powered up. In this situation an icon will appear in the task bar indicating that the new device has been detected. Clicking on this icon presents the option to view details about the installation process, resulting in the appearance of a dialog similar to the one illustrated below, where a Brother MFC-420CN printer has been detected and is being installed:

Windows Server 2008 Auto detecting and installing a USB printer

Once the printer has been installed, it will likely need to be configured for network sharing. To achieve this, launch the Print Management tool, select the print server to which the printer is physically connected and click on Printers. The center pane of the tool will display a list of printers installed on the current print server. Identify the required printer in the list, double click on it to display the properties dialog and select the Sharing tab:

Printer Share properties

If the printer is to be shared with network client, set the Share this printer check box and enter a suitable share name for the printer. This page also allows Client-side Rendering(CSR) to be configured. When selected, all rendering of print jobs is performed on the client and just the RAW print data sent to the server for printing. This offloads the rendering overhead to the client computers, thereby reducing the load, and increasing the scalability of the print server.
If Windows fails to auto-detect the printer it may be added manually from Print Management by right clicking on the print server to which the device is attached and selecting Add Printer.... On the initial screen select the Add new printer using an existing port and choose the port to which the printer is connected from the drop down list. Once selected, click Next to install a printer driver. If one is already installed, select it from the drop down next to the use an existing printer driver on the computer. Alternatively, select Install a new printer driver and either select the printer make and model from the list, or use the Have Disk to install the manufacturer supplied driver. Click Next to proceed to the Printer Name and Sharing screen. Choose whether the printer is to be shared and, if so, by what name. Proceed to the summary screen, review the information and complete the installation.

With a printer server configured and printers added the next step is to cover the management of printer servers on Windows Server 2008.